Here comes the fun stuff, time to finally start creating your first Facebook Ads campaign! There are two major reasons why Facebook Ads has been such a successful ad platform. The first is that you can instantly connect with over 800 million people that are currently using Facebook, and the second reason is that you can target them based on their interests, along with full demographics. In short, it’s a marketers dream come true.
Using everything we covered in the first five parts of this series, we will now walk through the whole process of building a Facebook Ads campaign from scratch. Let’s get started.
Step 1: Find an offer
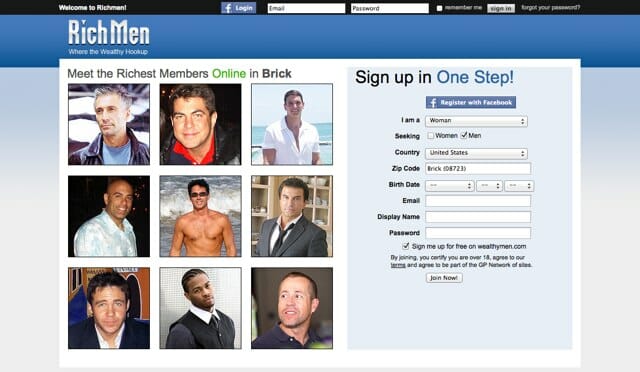
In this scenario, we are going to a use a dating offer, just for the sake of easy targeting and understanding. Obviously we will want to target people who are single, and depending on the landing page, we can focus on gender, interest, age and location. When advertising on any other web site, it might be an issue to target your ad campaigns for such a narrow demographic, however, through Facebook Ads it’s never been easier.
For this example, we will use the “Rich Men” dating offer seen below.
Step 2: Create Your Facebook Ads Campaign
Now that we have an offer, we can jump right into the campaign building process. Log in to the Facebook Ads Manager and click “Create New Campaign“, then you will be sent to a long form process like the one shown below.
1.) Design Your Ad
- URL – Your affiliate link, landing page or page you want to send people to
- Title – Make this your attention seeking tag line… grab their attention in just a few words
- Body – Here is where you will write a more detailed description of your offer, still using exciting and attractive words that keep them interested.
- Image – Upload an image from your computer to use in your ad copy. The size for images on Facebook Ads is 110×80 pixels. The image is the most incentivizing piece of your ad copy that will make people want to click your offer, and will grab their eyeballs as their are scrolling through Facebook related content.
Your next focus is on who you want to see the ad copy you just created. Since we are running a dating ad campaign, we have a strict demographic that we are looking for… the Single, Females in New York etc… as we mentioned above.
2.) Targeting
- Location – Self explanatory, but you can go very deep in this targeting… even down to ZIP CODE. Try to not to target ad campaigns too tightly on location, unless you are doing local advertising.
- Demographics – Again, mostly self explanatory, but extremely beneficial when building ad campaigns. The “age” targeting will play a huge impact on the actual “Suggested Bid” rate that you will have to pay on a CPC or CPM basis for each campaign. If you are split testing, keep ages in a 5 year range. (ie: 25-30, 31-35 etc).
- Interests – This one field in itself had made Facebook Ads one of the most powerful solutions out there. You can target nearly anything, such as movies, celebrities, books, activities, games and more. In this example we are targeting “Movies” and “Reality TV”, just to be creative.
- Advanced Demographics – If you are running a dating related offer, the advanced demographics are exactly what you are looking for. Since we are running a dating offer and looking for single women, that is exactly what we selected for this ad campaign. You can also select “Language” which often comes in handy when advertising outside the United States.
- Education & Work – Not use that often by marketers, but still useful for education and jobs related ad campaigns. Select to advertise to a demographic based on their education level, or where they are currently working.
The third step in the campaign creation process has to do with your ad pricing, budgeting and when your campaigns will go live.
3.) Campaigns, Pricing and Scheduling
- Campaign Name – Self explanatory, just keep it simple and detailed enough so you can determine which campaigns are which.
- Budget – This is how much you want to spend on your campaign per day or month. I recommend setting a low daily budget when first starting out. The minimum is only $1, but a $10-$25 daily budget is a safe range to make sure you don’t blow the bank too quickly.
- Schedule – From here you can select to run your campaign continuously, or only during certain dates and times.
- Pricing – Decide whether you want to advertise on a CPM or CPC basis. We covered the difference between these two and suggested bidding in the “Manage Your Budget” section. It is recommended by most Facebook Ads users to go with a CPC advertising model.
Now that your ad campaign is created, you can click on the “Place Order” button and make your campaign go live. You will now have an active ad campaign running on Facebook Ads, and are just waiting for approval from the Facebook Ads Team, which usually is done within 24 hours.
Final Campaign Review
You can now look up the full details on your new ad campaign. Everything from who you are targeting, to your actual ad copy, all the way to how many people have seen and clicked your ads… it’s all in the Facebook Ads Manager. From here you can also edit, add and remove ad campaigns. If you would like to build a new campaign from scratch or create a new ad copy for an existing campaign, simply click on the green “Create an Ad” on the top right of the page.
That’s it! It’s a long detailed tutorial, but the average marketer will know what to fill in and how to get a campaign running on their own. For any new Facebook Ads users or marketers, you will quickly get familiar with the system and have a ton of ads running in no time!
This post is part 6 of a 7 part series on creating your own Facebook Ads campaigns.


Affpaying
November 29, 2011 at 2:56 am
Thanks for the great tutorial Zac. It could be great if you could post some facebook case studies with us. Thank you 😉