For the vast majority of websites out there, the way your website is hosted by companies such as GoDaddy, Hostgator, WP Engine and more is through shared hosting – this is basically a server that is shared, in terms of its resources, with other websites. This means that each websites and it’s demands for resources are juggled between others, to satisfy the needs of each website.
The main benefit of shared hosting is that it is cheap. However, what happens when you get spikes in traffic? Shared hosting might not cope, and will certainly change IP addresses, as your website has go to another shared server to cope with the influx of traffic. What happens if websites on the same shared IP address have an security flaw or bad reputation with Google? – it could potentially affect your website too. That, as well as a lack of control, and the argument to go to a dedicated host increases.
This, along with other reasons, is generally why people like to go to dedicated hosting, albiet it being more expensive. You own the server, meaning it is more capable to deal with traffic. It will also be more secure for you too.
The problem stems that moving from a shared to a dedicated host is a big migration to do, that could potentially lose data. Migrating can have downtime for your website, or cause other issues with your website that will affect the user experience. I’ve recently moved one of my websites, Poem Analysis, from shared hosting to dedicated hosting on GoDaddy. To help others in similar situations and to give an idea of the work required, here are the steps I took to achieve this migration.
Clone Files to New Hosting Server
The first step, once you have purchased the servers, is to get all of the existing files of your current website onto the new dedicated host. As costly as this was, I paid GoDaddy to do this – this involves them pretty much copying and pasting all the files from my previous website on the shared hosting to the new dedicated server.
The reason I did this was due to the lack of experience of the cpanel interface, as well as server level modifications. The only experience up to this point I had at such a server level was when briefly looking at the files using a FTP server, such as WinSCP. However, looking back, it should be pretty simple to clone files to a new server:
- You can copy all of your files using an FTP login and simply saving them all in a program portal to your website’s server, such as WinSCP.
- Failing this, you can clone your website pretty straight forward with a whole range of plugins for WordPress websites.
Either way, $100 to clone a website onto a new server…well I wouldn’t pay that again!
Remove Add On/Main Temporary Domain Name/s
When you stick the new files onto the new server, you are going to have to have the files work for a specific domain – unfortunately, you won’t be able to use your current domain, since this is linked to your current shared server that’s live. So either you’ll have to use a temporary domain of yours, or a subdomain, to link the dedicated server files to a domain, and for them to go onto the server. You can remove a domain linked to the files on a server – it just means the files are temporarily not accessible by typing in any domain into a web browser.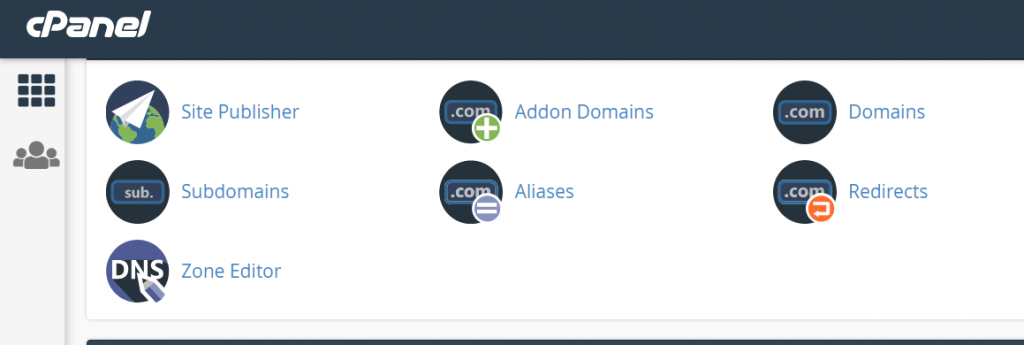
Add Add On/Main Domain Name/s
Once you have removed the add on domain name or temporary domain name, you now need to add the main domain name (correct domain) to your dedicated server hosting. When this happens, make sure you update your correct domain name’s DNS IP address to the new IP address of the dedicated server.
At this point, it is important to delink your shared hosting website from your correct domain name. This could cause your website to temporarily be down for a little while, whilst you finish the process.
In this case, I would recommend choosing an unsociable hour, when traffic is at its minimum, to do this. This will minimize the potential impact of your website being down for your web traffic.
I would also recommend using a proxy with a cache during this time too. When I changed my website over to dedicated hosting, I was (and still am) using Ezoic as a proxy for advertising and caching. This meant that as long as Ezoic had stored a cached file of the website and didn’t request a new version, the website would stay live as long as the cache did not expire. This gave me some flexibility when it came to the migration, knowing the website would not be done at all.
This also meant that, when I was ready, I could test the new server worked correctly, without the website being down at all (or for the most minimal of time). A small tip that can help keep your website up!
#3 Remove Temporary Domain from Installatron
In the CPanel dashboard, the next step is to remove the temporary domain you used in step #2 from your server, so you are able to link your correct domain to the server. This is done by going into Installatron, and removing the website:
- Click on Installatron
- Click the settings icon for your website
- Click on the Advanced tab
- Tick ‘Remove from Installatron?’
- Click save
This will remove the Installatron application (domain linked to your server files). Files, directories, and database tables will not be affected so don’t worry about them being lost.
#4 Reinstall Correct Domain Through Import
Once you have done #3, you can now reinstall the correct domain name in Installatron:
- Go to Applications Browser in Installatron
- Under ‘Apps for Content Management’, choose WordPress
- Under ‘Install’, choose ‘Import existing install’ – this is basically stating that we have already installed the WordPress website, and just reinstalling the application to the correct domain
- On the next screen, choose ‘From this account’ and press ‘Continue’
- Choose from the drop down the correct domain and click Import
From here, your website should now be linked to your new domain. If it doesn’t, recheck your DNS of your domain is pointing to the right IP address, or clear your cache files of your browser and reload.
#5 Resave Permalink Structure in WordPress on Dedicated Hosting
A funny thing can happen when changing servers, that WordPress sometimes forgets the internal permalink structure when changing between servers. It is a common occurrence to happen, and one that can easily be rectified. If you try to click onto any of your links, and a 404 error appears, go to Settings, click Permalinks and press save – this will reaffirm the permalink structure of your website, linking the pages to the correct URLs.
Tips for Potential Issues Whilst Hosting Migration
Although my migration went quite well and smoothly, there are some potential issues you might come by, of which I hope the following should help you with:
- Firstly, always make sure you have support from your host, whoever you use, during the actual migration process of changing IP addresses and migration of domain name. This will help you with debugging any issues, if you have technical support to help guide you away from ‘rabbit holes’.
- Perform a site audit – Use the likes of SEMRush, Moz or Ahref before and after the migration to see how errors compare before and after the migration. This will help you identify any potential issue, relating to any 4xx or 5xx errors, slow loading pages and more.
- Reenter any license keys – If you use premium plugins such as Yoast SEO Premium, Wordfence Premium, or any others, which are intended for the use on just one website, you might find that you will have to renter the license keys after deleting the files and website from the shared hosting. However, only delete the shared hosting files once you are completely happy with the website migration.
- Back up using a WordPress plugin before the migration, and after. As well as this, make sure you have a backup of all files with another source (in my case, GoDaddy stores daily backups of my website on shared hosting server for 30 days).
- Write a log of everything you do. It is so extremely easy to make a change during the migration, that you are unaware of the impact it can make. I was prone to this mistake, especially when interacting with a completely new user interface (which was CPanel for me). From making a record of everything you do, you are better able to debug and understand what caused you issues – this is exactly how I was able to make this article, since I made a record of everything I did throughout the migration.