 Many people would like Analytics to display details about your AdWords keywords and costs. In order to do this you will need to use destination URL tagging or manually tag your keywords one by one. By auto tagging URL’s you will give each URL a unique ID to tag it and cause it to be unique
The unique character given in auto-tagging is called “gclid” and will show up in your landing page URL when a user arrives at your site from your ad. For example, if your site is www.mysite.com, when a user clicks on your ad it will appear in the address bar as:
www.mysite.com/?gclid=123xyz This is the auto targeting manually putting it in there.
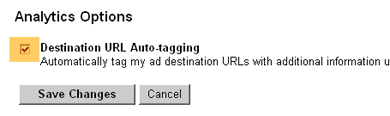
To enable/disable auto-tagging:
- Sign in to your AdWords account at http://adwords.google.com.
- Click the My account tab and select Account preferences.
- In the Tracking section, click Edit.
- Modify the Destination URL Auto-tagging checkbox.
- Click ‘Save changes.’
Keep in mind that auto targeting may not be available for every website out there. Due to redirects and server settings some websites may not work with all the settings.
To determine if auto-tagging will work for your website:
- Append ?gclid=test or &gclid=test (if your destination URL already contains other parameters) to the end of your AdWords destination URL
- Paste this modified URL into your browser’s address bar, and press Enter
- Auto-tagging will not generate an error if the resulting page displays gclid=test in the address bar.
- If the resulting page does not contain gclid=test, please notify your webmaster and refer to our troubleshooting guide (in English only).
Using Destination URL Auto-tagging will help you to track better your landing pages and where people are going with your campaigns.
You must be logged in to post a commentLogin